
When you think about it, sewing is nothing more than joining fabric using string and a metal stick with a hole in it. Ancient peoples used the same techniques we use today. They put two skins together with a bone needle and sinew. See? Not intimidating at all.
So, put away your reservations and fears and embark on a journey to greater self-dependence. Are you tired of paying big bucks to a tailor or dry cleaning store to hem a skirt or a pair of pants?
If you can sew, you can solve those problems.
How to sew by hand
Mankind has always sewn by hand. Until the 1830s, all sewing was done by hand. Tailors and seamstresses turned out both prosaic, practical work clothing and stunning, elaborate costumes. If they could do it, so can you.
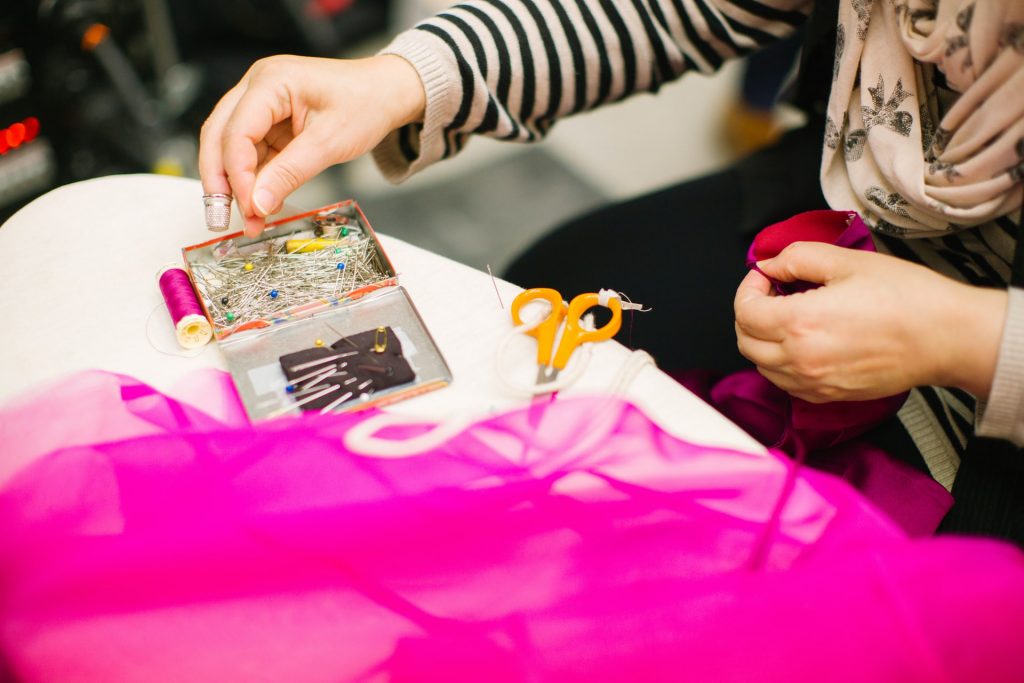
The kit you’ll need
To begin, you’ll need to buy the basics.
Needles
Hand-sewing needles are made of steel with one sharp pointy end and a hole for the thread at the other. No, one size does not fit all. There are hundreds of different needle types and sizes. Using the wrong needle, though, is a common cause of sewing disasters.
For hand sewing, needles designated ‘sharps’ do the best job. With their very sharp point, they will easily punch right through the empty spaces between the weave of the fabric and leave no trace of shredded cloth behind.
Needles are sold in sizes that equate to the type of fabric. The smaller numbered sizes have greater diameter and strength while the larger numbers are for light fabrics.
| Sizes 2, 3, and 4 | Use for medium to heavy fabrics |
| Sizes 5, 6, 7, 8, 9, and 10 | Use for light to medium fabrics |
| Sizes 11 and 12 | Use for fine or delicate fabrics |
Pro Tip: For normal mending and sewing chores, a pack of sharps that includes several needles of varied sizes is a good investment. They are inexpensive and available online or in stores.
Threads
This is another confusing choice. There are many specialized choices that you can safely ignore. You need two kinds of thread. First, you use cotton thread to use with natural fabrics. A polyester thread is for synthetic fabrics. It’s just that simple.
Pro Tip: If you are assembling a home sewing kit, buy black, white, and at least one neutral color in both cotton and polyester.
Notions
This word describes all the extra doodads you need to sew well. The following should be part of your first home hand-sewing kit. You can either buy these individually or as part of a hand-sewing kit.
- Scissors
- Ruler
- Pincushion and Dressmaker’s Pins
- Seam Ripper.
- Metal Sewing Gauge
- Disappearing Marking Pens or Dressmaker’s Chalk
- Thimble
- Steam iron
Hand sewing techniques (step by step)
Buy or find some regular cotton remnants for your practice stitching. A yard of fabric will do nicely. The important thing to accomplish in any kind of sewing is to make stitches even; otherwise, the seam will either gap or be too tight or, worse yet, both.
Pro Tip
For a great hack to make sure your hand stitching is even, the National Sewing Circle shows you how to easily accomplish this without buying a thing.
Also, try to keep the tension even, not too loose nor tight. You’ll end with a smooth, professional-looking seam that will look great and last.
Thread Your Needle
You can either use one thread or a double thread in your hand sewing. The double-thread technique is best for medium to heavy-weight woven natural fabrics. To thread the needle, you’ll need to take the needle to the thread rather than stabbing at the needle with the thread.
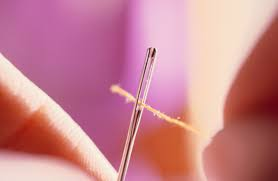
- Hold the thread between your index finger and thumb with about ¼- inch of the thread peeking out.
- Next, bring the eye of the needle down onto the thread end.
- If you’re using double threading, pull the thread through the eye of the needle. Don’t use too long a thread length to avoid tangles. About 12 inches is just right.
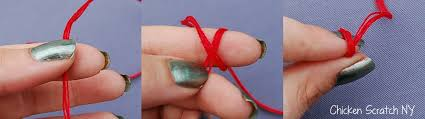
- After threading the needle, you need to put a knot at the farthest end of the thread. To do this, bring the thread ends between your index finger and thumb. Loop the threads around your finger. You should end up with a short cross of threads at the end of the loop. Roll and twist, then pull gently on the thread. It may take practice, but this will soon become second nature.
- At the end of your stitching, to knot the thread into place, take a very short stitch. Pull on the stitch until there is just a short loop. Run the needle through the loop and pull tight. Do this twice at the end of every length of thread length.
Pro Tip
After threading, run the thread across beeswax. There are small containers with slits for the thread in any sewing notions section. This will keep your thread strong and your stitching smoother.
The Running Stitch
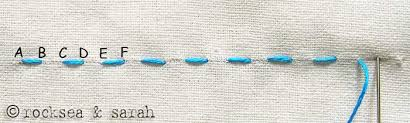
The running stitch is the simplest, the one that joins seams. If you mark your fabric with a disappearing marker or use the finger-marking technique demonstrated above, you can put your needle into and out of the fabric and take several stitches before pulling the thread through.
A stitch length of about ⅛ inch works for most seams. If you are basting, just using your stitches to keep fabric layers together temporarily, a stitch length of ½ inch is fine while not using any knots.
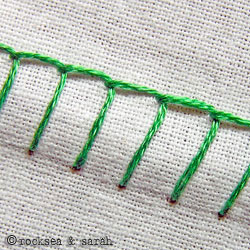
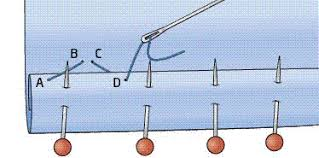
The Blanket Stitch
The blanket stitch is a decorative way to finish your seams on woven fabric. This finishing is important because, without it, the fabrics will fray. You can either stitch your way to a cohesive seam or buy pinking shears that will give you tooth-like edges that won’t unravel.
The blanket stitch goes over both edges of the seam, stitching them together.
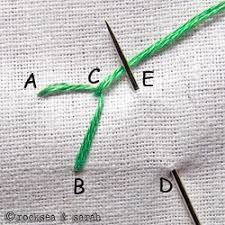
- Take the edges of the seam allowance and hold them together.
- Pull the knotted thread through one end of the seam a quarter-inch from the edge. If you are righthanded, this will be the right side and vice versa for lefties.
- To secure the thread, poke your needle again through the same spot, creating a loop.
- For the first actual stitch, put your needle down from the top about ¼ inch over from the first thread’s entry and about ¼ inch from the edge of the fabric.
- To finish the first blanket stitch, bring the needle from back to front through the thread’s loop. This will create a straight line down from the edge. Be sure that the needle is within the loop before pulling it tighter.
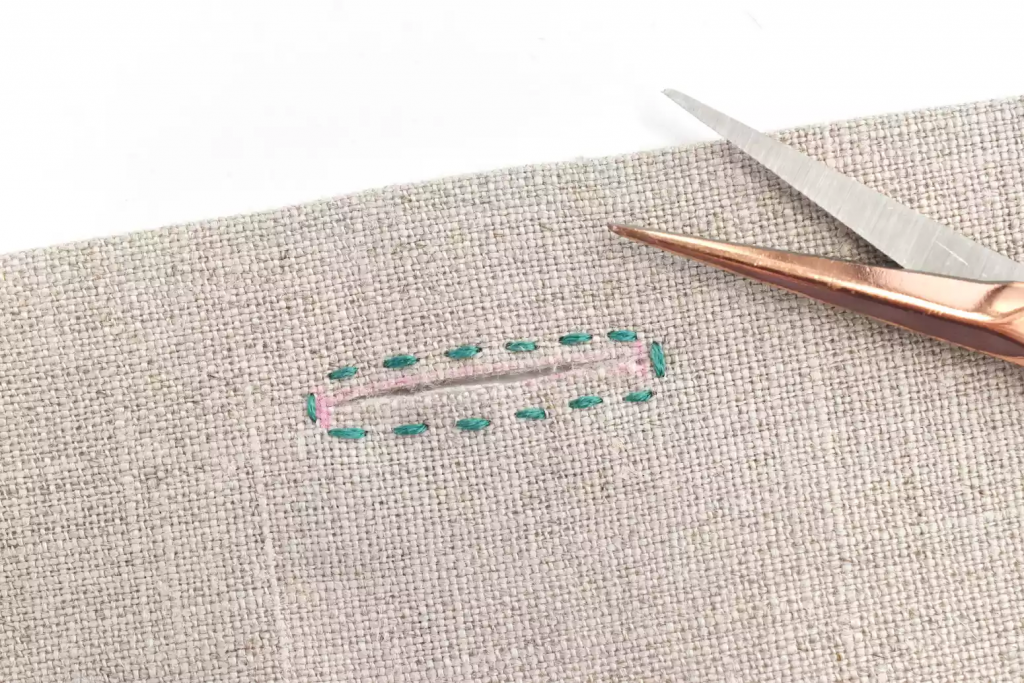
The Buttonhole Stitch
Buttonholes can be a beautiful addition to any garment or home decor item. There are many styles from the traditional to the stylish and functional keyhole buttonhole.
The trickiest part of making a successful buttonhole whether by hand or machine is to get the size of the hole just right. Too tight and the button will have a hard time going through. A hole that is too loose won’t hold the button at all. Use a metal sewing gauge to easily measure your button.
For thin buttons, you can make the buttonhole the same size as the width of the button. For thicker buttons, you’ll need a bit more ease. For instance, if your button is ¾ inch wide and ⅛ inch thick, mark the buttonhole width at ⅞ inch.
Mark the buttonhole on the fabric with chalk or a disappearing ink fabric pen. Horizontal buttonholes work best when they extend ⅛ inch over the center front or back toward the edge of the garment. Vertical buttonholes are best sewn on the centerline of the back or front. Verticals are best if your garment has plackets.
Horizontal buttonholes should extend 1/8 inch over the center front or back toward the garment edge. Vertical buttonholes should be sewn on the center front or back lines and are best for garments with a banded or placket opening.
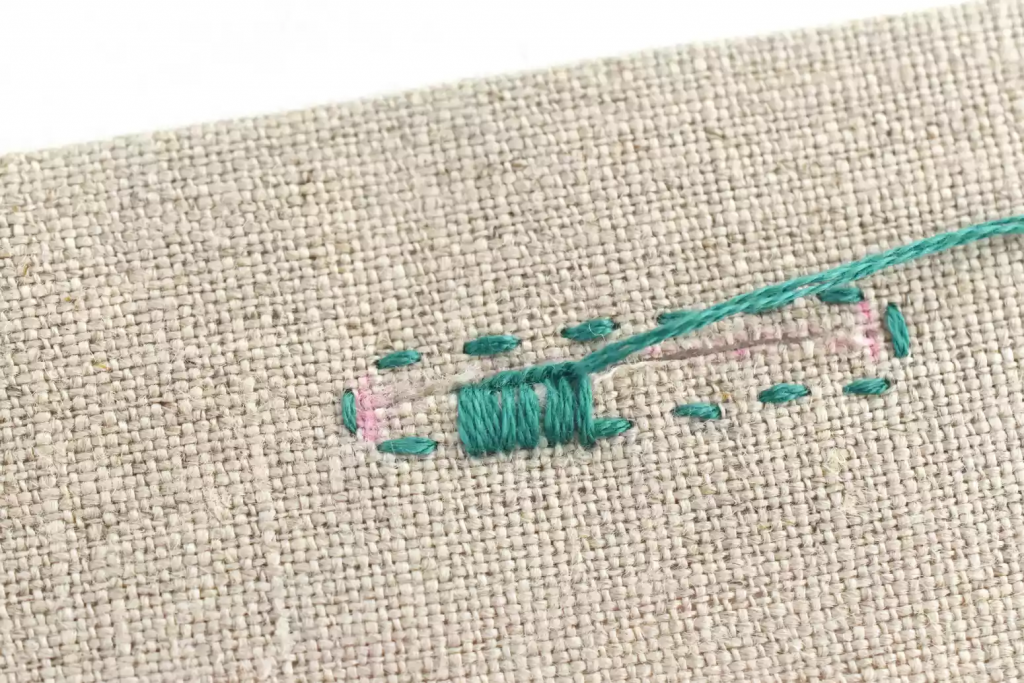
Stitch a short basting stitch along your markings. Don’t tie off or cut the thread
With small, sharp scissors (embroidery scissors work best), cut the threads within the markings. Leave a few threads between the cut and the basting.
Using the thread from the basting, sew a very close blanket stitch as demonstrated above around the entire basted area.
Hemming
There are several ways to hem a garment, curtains, or other household projects. The easiest to use is the blind hemstitch. It isn’t decorative, but it is invisible and secure, as well as the easiest to learn. This stitch is just a more closely spaced version of the blanket stitch.
- Measure your garment and plan the hem. There should be enough fabric to fold the bottom 1/2 inch up, then fold the rest of the measurement. So, if you need a 2-inch hem, fold over ½ inch then iron the crease. Next fold over 1-½ inches and iron the folds in place.
- Using dressmaker’s pins, secure the planned hem every inch or two.
- Use thread that matches the fabric as closely as you can. For the length of the thread, try about 18 inches or as long as your arm.
- Thread your needle then secure the end of the thread with a knot, You can use a single thread for light fabrics or double thread for heavier fabrics.
- Bring the thread through the folded-down part of the hem up to the front. Don’t mistakenly put the needle through the front of the fabric.
- Move the needle to about an inch away then put it through a very small amount on the right side. You can stitch from left to right, or, if you’re left-handed, from right to left. Don’t make stitches too tight or loose. The hem should lay flat and the stitches invisible.
How to machine sew
If you’re loving sewing and are ready to take on bigger projects, then it’s time to embark on your sewing machine journey. While it may seem a little scary at first, there’s actually nothing to be afraid of. We’ll take you through the basics, and you’ll be set to go in no time.
Buying a sewing machine
If you want to sew faster and with even stitching every time, a basic sewing machine will do the trick. There are handheld types, but they are often more difficult to use and fussier than a real machine.
Most good sewing machine makers have entry-level models at $100 to $150. These are easy to learn, sturdy enough for light to medium use, and portable. You can take a machine with you on vacation, to a sewing class, or hide it in a closet when you aren’t using it.
Pro Tip
You might find a used sewing machine for sale that has hundreds of stitches and myriad capabilities. If you’re new to sewing, buy a new basic model instead.
Pro Tip
An in-person class on basic sewing will be a great investment of your time. Fabric stores, sewing machine dealers, online webinars are available. Every hour spent learning the basics translates into avoiding at least 10 hours of preventable misery.
Sewing machine needles
Machine needles are sized differently than hand sewing needles. There are two numbers separated by a diagonal line. The number on the left of the diagonal is the size in imperial sizes and the second number to the right is metric.
Needles are either sharps or ballpoint, used for knits. Pick the right needle for your project. It’s great to have common sizes of both in your sewing space.
Before purchasing needles, check your sewing machine’s manufacturer’s guide for brands and types that work with their machine.
| Size 9/70 | Light fabrics like silk and taffeta |
| Size 11/80 | Medium fabrics like cotton, linen, and satin |
| Size 14/90 | Medium to heavy fabrics; the go-to in-between needle |
| Size 16/100 | Heavy fabrics like denim, curtains, soft furnishings |
Threads
The type of thread you will need depends on the fabric you will sew. Choosing the right thread in as close a color to the fabric makes the difference between pride and misery. Save yourself the headaches; just take a moment to make sure your choices are good ones. Here are the thread types that will work for most beginners’ projects.
- Cotton and other natural fibers
- Polyester, an all-purpose thread
- Denim for jeans
- Upholstery for heavy-duty fabrics
Getting ready to sew
Your machine will have directions that show how to prepare your machine for sewing. If you bought a used machine without the manufacturer’s instruction book, search for an online version or check a resale site.
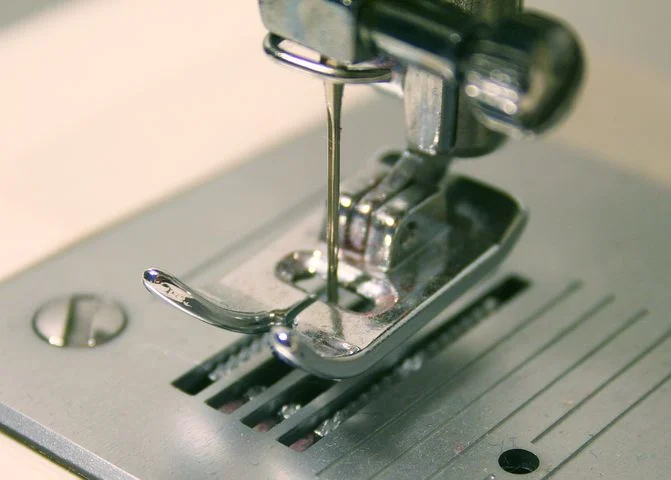
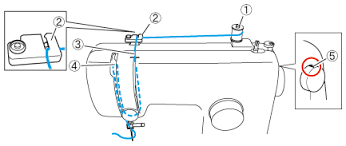
Threading the sewing machine
Threading a sewing machine the right way is crucial to your success. If the upper thread or the bobbin is not threaded correctly, it will result in a tangled mess that will take a long session with the seam ripper. It’s even possible for the needle to break and perhaps, really, put an eye out.
You need to thread a sewing machine in two places. The spool of thread usually sits on top of the machine. It is threaded through various paths depending on the brand and style of the machine.
Next, a bobbin must be loaded with thread. The bobbin is responsible for the bottom of the stitch. The bobbin is wound by running the thread spool to the bobbin. Each machine does this differently.
Pro Tip
Some machines have automatic bobbin threading capability. It’s probably worth investing in this feature. Drop-in rather than side loading bobbins are another good choice for new sewers.
Threading the needle
This is somewhat easier than threading a hand needle. For one thing, the machine needle is clamped in place, not between two shaky fingers. Be sure to turn on the machine’s light and, if you need to, put on some reading glasses.
- Take the thread you’ve just put through the path from the thread spool into your thumb and index finger. Bend your finger and thumb so that they are making a circle.
- Hold the thread tightly about a ¼ inch away from the needle’s eye.
- Now, just straighten out that circle, and the thread will move into the needle. Practice.
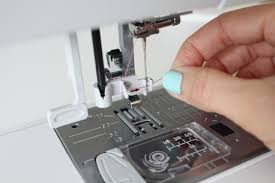
Threading the bobbin
This can be fussy and frustrating. Accept that it can only be successfully threaded in one way. There is no ‘close enough’ in bobbin-land. Read the directions and watch the videos until you can get it to work perfectly every time.
Pro Tip: Invest in some inexpensive plastic bobbins and a spool of ordinary black thread. Practice winding bobbins on scrap fabric until you are batting a thousand.
Sewing with a machine
Sewing by machine is easier and faster than hand-sewing. There are just a few things to learn.
- Securing the stitching at the beginning and end is easy but crucial. Just take a couple of stitches backward then forward then repeat. You just need to capture about ⅛ inch for these stitches. This is better done without the pedal. Just move the wheel of the machine by hand backward and forward.
- Basting is easy. Don’t secure the stitching at either end. Adjust the length of the stitch to its longest setting.
- Straight stitching holds seams together. A stitch length of 2.5mm or 10 stitches per inch is a good rule of thumb.
- Hemming may be easier to do by hand. Machine hemming, because of its speed, is sometimes problematic if you aren’t experienced.
Pro Tip
Before you sew, every time, remove the needle plate and take a sewing machine lint brush to remove all the lint collected. Consult your machine’s manual to see if the machine needs to be oiled and where. Many machines do not.
Wrapping up
Sewing is a great skill for everyone from first-graders to grandparents, both men and women. Go ahead and give it a shot. You might find a hidden talent just waiting for a chance to show. Whether or not you become a seamstress, tailor, or award-winning art quilter, sewing will give you independence and self-reliance.
Read more